3 Fun Arduino Projects for Beginners: Traffic Light, Button-Controlled LED, and Temperature Monitor
Getting started with Arduino is exciting, especially when you can create interactive, real-world projects with just a few components and some basic programming skills. In this article, we’ll walk through three beginner-friendly Arduino projects: a Traffic Light System, a Button-Controlled LED, and a Temperature and Humidity Monitor. Each project will introduce new skills, from using sensors to handling user input, and will help you build a foundation for more complex Arduino experiments.
Table of Contents
- Traffic Light System Project
- Button-Controlled LED Project
- Temperature and Humidity Monitor Project
- Frequently Asked Questions (FAQ)
1. Traffic Light System Projects
A simple traffic light model is a great way to learn about controlling multiple LEDs with Arduino. This project simulates a traffic light sequence with red, yellow, and green LEDs.
What You’ll Need
- Arduino board (e.g., Arduino Uno)
- Red, yellow, and green LEDs
- Resistors (220-ohm or 330-ohm recommended for each LED)
- Breadboard and jumper wires
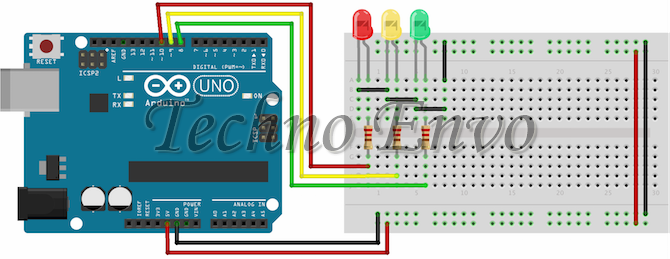
Circuit Setup
- Place LEDs on the breadboard. Position them in the order: green, yellow, and red.
- Connect resistors to the anodes (long legs) of each LED.
- Wire each LED:
- Connect the green LED to pin 8.
- Connect the yellow LED to pin 9.
- Connect the red LED to pin 10.
- Connect the cathodes (short legs) of each LED to GND.
Code
Explanation
This code makes the LEDs light up sequentially: red for 3 seconds, yellow for 1 second, and green for 3 seconds. This mimics a real traffic light and introduces you to controlling multiple outputs.
2. Button-Controlled LED Project

In this project, you’ll use a button to control an LED. It’s a great way to understand digital input and explore interactive programming.
What You’ll Need
- Arduino board
- LED (any color)
- 220-ohm resistor
- Push-button
- Breadboard and jumper wires
Circuit Setup
- Place the LED on the breadboard. Connect a resistor to the anode (long leg) and connect the other end of the resistor to pin 8.
- Connect the cathode (short leg) of the LED to GND.
- Add the button:
- Connect one leg of the button to pin 7.
- Connect the other leg to GND.
- Add a 10k-ohm pull-up resistor between pin 7 and 5V to prevent floating values.
Code
Explanation
The code reads the button’s state. When the button is pressed, the LED lights up. Release the button, and the LED turns off. This project introduces you to reading input from sensors or buttons, a fundamental skill for Arduino projects.
3. Temperature and Humidity Monitor Project
This project uses a DHT11 sensor to measure temperature and humidity, displaying the values in the Arduino Serial Monitor. It’s an easy way to start working with sensors.
What You’ll Need
- Arduino board
- DHT11 sensor
- Jumper wires
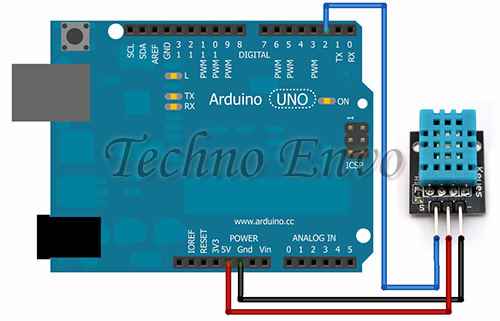
Circuit Setup
- Connect the VCC pin on the DHT11 to 5V on the Arduino.
- Connect the GND pin on the DHT11 to GND.
- Connect the DATA pin on the DHT11 to pin 2 on the Arduino.
Code
To use the DHT11 sensor, install the DHT library in the Arduino IDE:
- Go to Sketch > Include Library > Manage Libraries and search for “DHT sensor library.”
- Install the DHT sensor library by Adafruit.
Once installed, use the following code:
Explanation
This code reads temperature and humidity from the DHT11 sensor every 2 seconds and displays the values on the Serial Monitor. It’s an excellent project to start using sensors and understanding how to display data in real-time.
Frequently Asked Questions (FAQ)
Q1: Why is my traffic light system not lighting up correctly?
- Answer: Ensure each LED is correctly connected to its designated pin and that you have resistors in place. Also, check your code for any mistakes in pin assignments.
Q2: Why isn’t my button-controlled LED responding to the button?
- Answer: Make sure the button is properly connected, and the pull-up resistor is in place. Check that your code reads from the correct input pin and that your wiring follows the schematic.
Q3: My DHT11 sensor isn’t displaying temperature or humidity values. What should I do?
- Answer: First, confirm the DHT library is installed correctly. If the sensor still isn’t reading, check that it’s wired correctly and that the data pin is connected to the specified Arduino pin.
Q4: How can I view the data from my temperature and humidity monitor?
- Answer: Open the Serial Monitor in the Arduino IDE (use Ctrl+Shift+M or go to Tools > Serial Monitor) to see the temperature and humidity readings in real-time.
Q5: Can I use these projects for a larger Arduino project?
- Answer: Absolutely! These basic projects can be building blocks for more complex systems. For example, the Traffic Light System could be expanded to include pedestrian crossings, and the Temperature Monitor could be combined with a display or integrated into a home automation system.
Conclusion
These three projects introduce fundamental skills for Arduino programming and electronics. From creating a simple traffic light to controlling LEDs with a button and measuring temperature and humidity, you’ve learned valuable basics in wiring, coding, and sensor integration. Keep experimenting, and soon you’ll be ready to tackle even more advanced projects. Enjoy your Arduino journey, and happy tinkering!