Electric motor is very straightforward mechanical equipment, but rewinding them is not—in fact, this is one chore that is typically best left to the specialists. The rewinding procedure might vary substantially because to the large variety of various motors and winding patterns. However, it usually entails removing the old windings from the motor’s stator or armature and replacing them with new coils produced from wire of the same basic kind and gauge.
Steps to Rewinding an Electric Motor
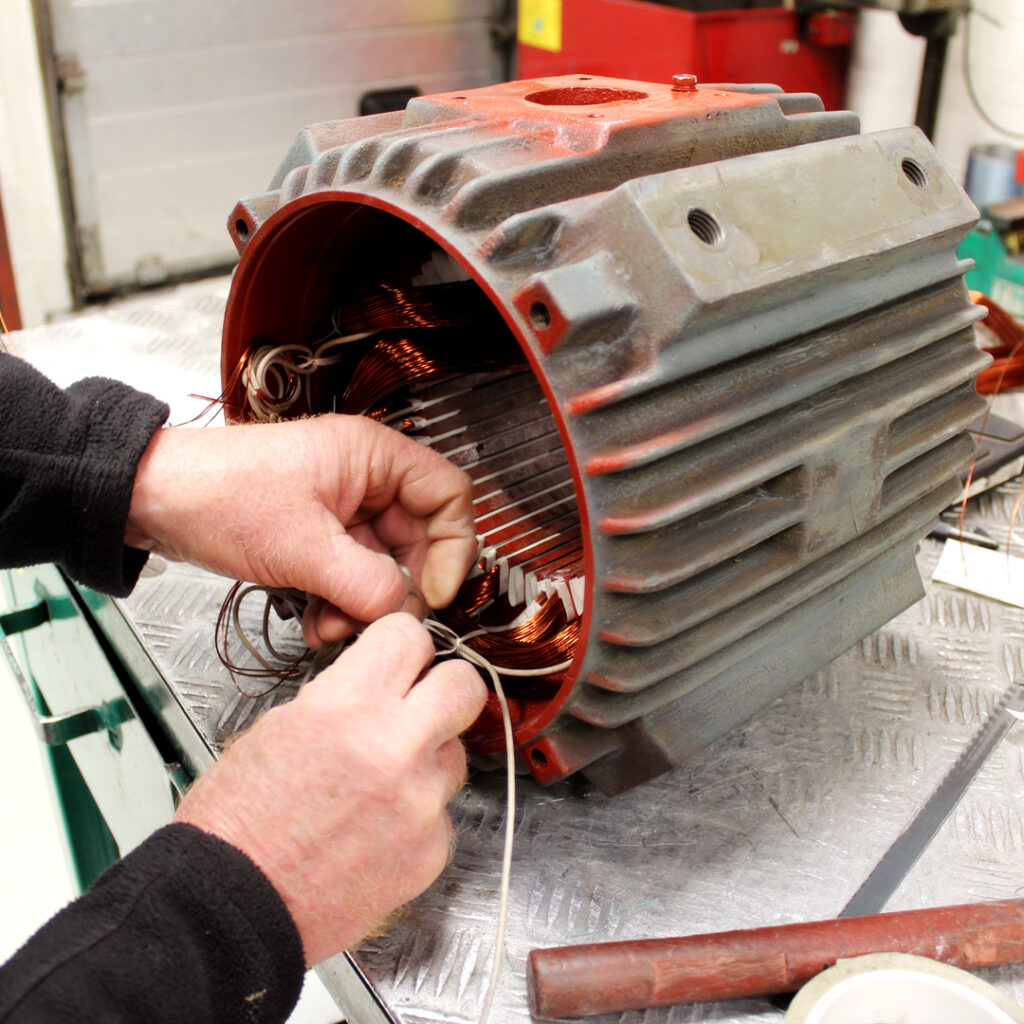
Electric Motor Disassembly
With a lint-free cloth, clean your work surface.

To eliminate any standing dust or dirt, softly run the cloth over the table, desk, or work bench where you’ll be tinkering. Before you start the engine, it should be thoroughly clean.
- Working on a filthy surface may cause dust or debris to enter the motor casing.
- It’s also crucial to make sure there aren’t any metal shavings in the area because you’ll be dealing with magnetic parts that, if you’re not careful, might accidently lure them in.
Remove the motor’s outer casing.
On most tiny motors, this will need unscrewing four screws from around a small endplate on the top and bottom of the unit. You’ll be able to examine each of the motor’s key internal components, including the stator, armature, and windings, after they’re removed.[2]

The stator is a permanent steel drum that surrounds the internals of an electric motor. It usually transports the electromagnet.[3]
The armature (sometimes known as the “rotor”) is a tiny bearing-like component located in the centre of the motor. It spins when it receives the magnetic force of the stator and windings, which powers the motor.
Windings are lengthy coils of copper wire that are often found surrounding the stator. They direct electromagnetic energy into the rotor, causing the Electric Motor to spin.
Take photos of the motor’s present setup.

Take a few shots of the inside of the engine from various angles, noting how each of the key components appears. Documenting the look of the motor before you begin making alterations to it might be useful if you make a mistake.
You may even film the disassembly process to confirm that you’re exactly replicating the original winding pattern and connections.
Hand-pull the armature from the stator.

After removing the upper endplate from the motor housing, pull the armature and the associated lower endplate straight out the bottom of the circular stator. The magnets around the stator will provide some resistance, so you may have to push a bit more than expected before it gives way.[4] Protect your hands by using gloves and avoiding spreading oils from your skin to any portion of the stator or armature.
Take care not to harm the armature or any of the motor’s surrounding components, notably the conductive copper commutation pads.
After you’ve removed the stator and armature, place the housing somewhere it won’t catch stray metal fragments.
Taking Out the Original Windings
Pry the brush pad tabs open with a screwdriver.

Insert the tip of a flat-bladed screwdriver behind the thin metal tabs, then gently pull up on the handle to lift them sufficiently to free the coiled wire. Some motors may have as many as 12-16 tabs in total.[5]
To avoid harming the tabs, bend them as little as possible. If one of them breaks off, you may have difficulty later on holding the new windings in place.
Using a pair of wire cutters, cut the old windings free.

The defective windings may be located on either the stator or the armature, depending on the kind of motor and the location of the problem. Snip each coil of wire where it links to the projecting posts at the top.[6]
It might be difficult to remove the wasted windings. To make removing the coils easier, it may be necessary to disconnect one wire at a time.
Make a note of the number of winds in each coil so you can rebuild the motor in the same arrangement.
Hand-pull the cut coils free of the armature or stator.

The old windings should come out with a couple of tugs once you’ve severed every last connection. If you’re having difficulties starting them, use the point of a screwdriver or a pair of pliers as leverage.[7]
Put on a pair of thick work gloves before handling the cut coils to protect yourself from cuts and scratches.
If the coils refuse to move, they may not have been totally cut. Look for any connections that you may have overlooked around the posts or at the bottom of the coil.
If required, swap out the insulating paper lining the stator.

Use a pair of pliers or tweezers to remove the old paper from the stator’s slots before making sure the empty slots are clear of obstructions. After that, cut strips of insulating paper from a sheet the same width as the slots’ width. Each strip must be manually inserted into a slot in the stator after being carefully folded.[8]
You can start the rewinding process and leave the existing insulating paper in place if it looks to be in excellent condition (it should be clean and undamaged). Before continuing, it’s a good idea to replace it if it seems scorched or otherwise damaged.[9]
Under no circumstances attach the new wire to the bare steel posts of the stator or armature. At all times, the coils must be insulated.
Electric materials distributors provide electric motor insulation paper for online purchase.
How to Install New Windings
Use the same gauge of wire to rewind the armature or stator.

The replacement coils’ wire must have the same thickness and number of winds as the original windings in order for everything to work properly. If not, it could not fit well or have conductivity problems.[10]
To find out what gauge of wire your engine typically has installed, conduct an online search for its voltage. You could be forced to eyeball the voltage if it isn’t shown anywhere.[11]
Choose a size bigger rather than a size smaller if you can’t obtain magnet wire in the same gauge as the motor’s original windings. Although thicker wire can somewhat slow down the engine, it poses less of a danger of overheating.
Consider taking this chance to switch from inferior nylon and polyurethane-coated wire to more modern enamel-coated wire.
Each pair of coils should be wound using the original pattern.

The particular sort of Electric Motor you’re fixing will determine the precise arrangement you utilise. Take great care to create each coil tightly, precisely, and compactly without any needless crimping or spacing in order to achieve excellent performance.[12]
Make sure the initial winding’s free end is long enough to connect with one of the metal tabs that surround the brush pads.
It is advised that you delegate the task to a specialist unless you are familiar with the required winding pattern. If you make a mistake, your motor could not operate properly.
Utilize the tabs on the stator to hold finished windings in place.

Lower the tabs over the coils each time you complete a segment. This will guarantee a correct connection once the Electric Motor is running and help hold them in place while you operate.
If you want a better connection, you may use a sharp knife or sandpaper to remove a little bit of insulating paper from the location where the wire connects to the tab.
The initial tab should be connected to the first and last windings’ loose ends.
Wrap the tab’s edge securely in the two wires. By completing the circuit, energy will be able to go from the generator via the windings and into the armature.[14]
Verify again that none of the wires attached to the tabs are in contact with one another.

Reassemble the motor.
Once you’ve successfully rewound your Electric Motor, replace the armature and stator in the motor housing. Replace the end-plates on either side of the device and tighten the screws until they are secure. If you did everything correctly, your motor should be as good as new.
If you can’t recall how the motor is intended to come together, look at the photographs or videos you shot previously.

Test the motor out.
Reinstall the Electric Motor in the device from which it was removed and give it a test run. If it doesn’t work, there’s a strong probability you made an error somewhere along the route. At this point, you’ll have no choice except to send it in for expert repairs or buy a new motor.[15]
If you see smoke or smell burning, turn off the engine right away. It’s conceivable that the new windings are overheating, or that there’s a short in one of the connections.

Benjamin David: The steps of electric motor rewinding are clearly explained.
Thank you so much.
Thank you. I’m gladding you like it.
Benjamin David: The steps of electric motor rewinding are clearly explained.
Thanks